How Often Should You Hone a Knife?
Keeping your kitchen knives sharp makes a world of difference in prep work and safety. You've probably wondered, "How often should I hone a knife?" The answer isn't a simple daily or weekly schedule; it's about how you use your knives and what you're cutting.
Honing realigns the microscopic teeth on your blade's edge, making it cut more efficiently. Per manufacturer specifications for many high-carbon steel knives, proper edge maintenance can extend their optimal cutting performance significantly. We'll break down exactly when and why honing makes such a difference in your kitchen.
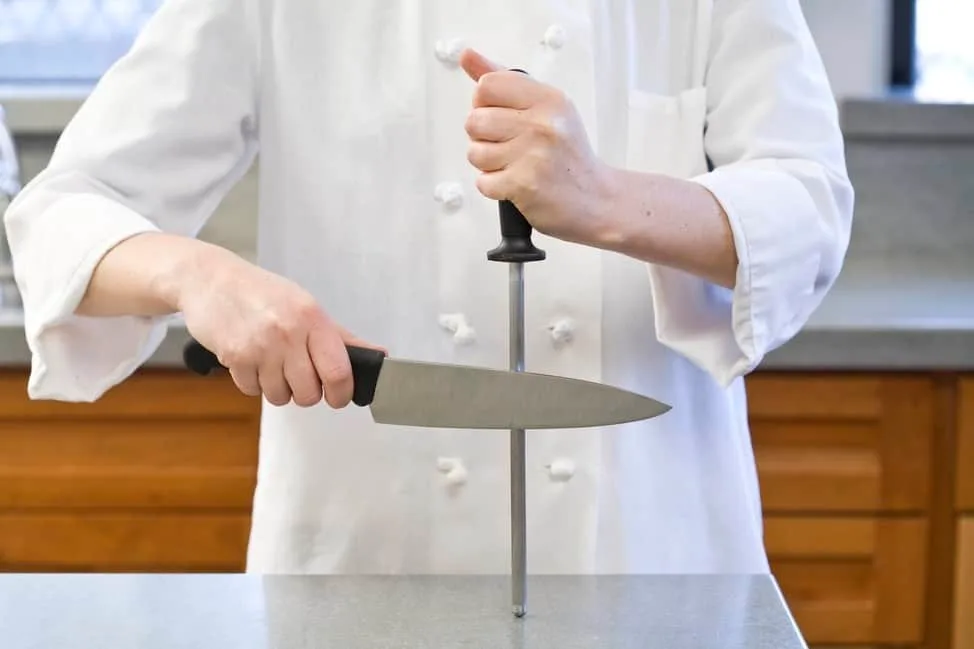
Image source: Bing (Web (fair-use with source credit))
Quick Answer
Hone your knife before each use if you're a heavy user, or every 2-3 uses for moderate home cooking. For lighter use, weekly honing is often sufficient. Pay attention to how the blade feels; if it pushes food instead of slicing, it needs attention.
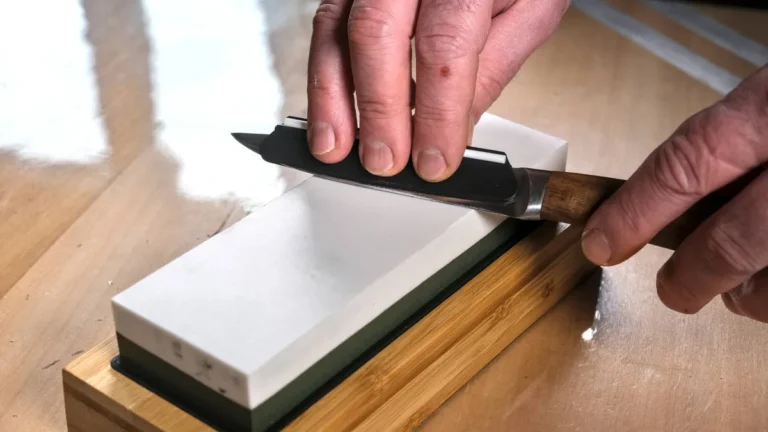
Sharpening is required when honing can no longer restore the edge.
Why Honing Matters: Keeping Your Blade Sharp and Ready
Honing is that crucial step that bridges the gap between a sharp knife and a knife that stays sharp for longer. It's a maintenance task, not a repair. Think of it as keeping your tools in top condition so they perform as expected, every time.
For instance, many culinary professionals adhere to a routine where honing is as standard as washing hands before cooking.
What Honing Does (and Doesn't Do)
At its core, honing is about edge alignment. When you cut, the incredibly fine teeth along the very edge of your knife get bent and distorted, much like a tiny comb’s teeth can get bent. This bending is microscopic, often invisible to the naked eye, but it’s enough to make the blade feel dull.
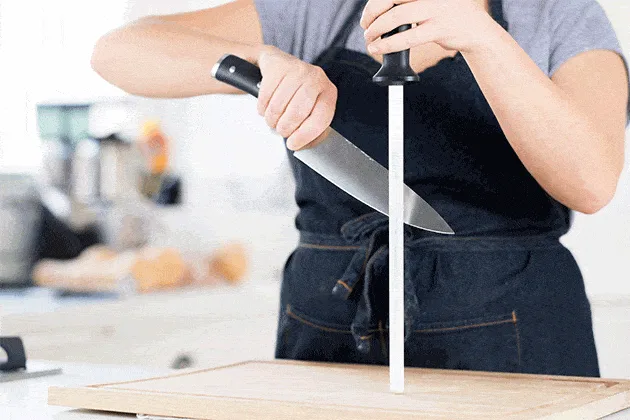
A honing steel, often called a honing rod, is designed to gently straighten these bent teeth, bringing them back into alignment.
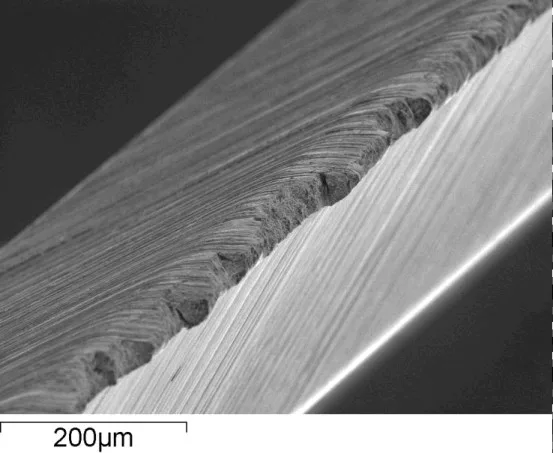
Image source: Bing (Web (fair-use with source credit))
Honing doesn't remove metal; it just realigns what's already there. This is the key difference between honing and sharpening. Sharpening actually grinds away a small amount of steel to create a new, sharp edge.
Because honing doesn't remove metal, you can do it much more frequently without wearing down your knife. Many knife manufacturers, such as those adhering to standards found at https://www.messer-und-sicherheit.de/ (a German safety and knife organization), emphasize that proper honing is key to maintaining a keen edge between sharpening sessions.
Honing Frequency: It Depends on How You Cut
So, how often should you hone a knife? The simple truth is, there's no single answer that fits everyone. The ideal frequency really comes down to your personal habits and the demands you place on your blades.
It’s a bit like asking how often you should oil a bicycle chain, it depends on how often and where you ride.
Your Cutting Habits: The Biggest Factor
If you're someone who spends a lot of time in the kitchen, chopping vegetables for an hour each day or breaking down meats regularly, you’ll want to hone your knives more often. For these high-usage scenarios, a good rule of thumb is to hone your knife before every use. This ensures that your blade is always in its best cutting condition, preventing the microscopic edge teeth from becoming severely bent.
For the average home cook who uses their primary chef's knife a few times a week for general tasks like slicing fruits, dicing onions, or preparing salads, honing every 2-3 uses is usually sufficient. You'll likely notice the blade starting to feel a bit less keen, or perhaps you'll need to apply a little more pressure than usual, which signals it's time for a quick hone.
If your knife use is lighter still, perhaps you only do a bit of chopping on weekends or for occasional meals, then honing once a week or even every other week might be perfectly adequate. The goal is to maintain the edge, not to overdo it. Paying attention to how your knife performs during use is your best guide.
Food Type: What You're Slicing
The type of food you’re cutting also influences how often your knife's edge might get slightly bent. Cutting through tough, dense materials puts more stress on the blade's edge compared to slicing soft items.
- Dense Foods: Repeatedly cutting through things like hard root vegetables (carrots, potatoes), dense squash, frozen foods, or even dense bread can cause the microscopic teeth on the edge to deform more quickly. If your prep work frequently involves these items, consider honing a bit more often.
- Soft Foods: Slicing soft fruits, tomatoes, or boneless meats is generally less impactful on the edge. If your kitchen tasks are primarily with these softer items, you might find you can hone less frequently.
It’s all about how much subtle bending and stress your blade's edge is enduring.
Knife Steel: A Quick Note
While the type of steel your knife is made from affects how long it holds a sharp edge (its edge retention), it also subtly plays into how often you might need to hone it. Knives made from harder steels, typically those with a higher Rockwell hardness rating (often above 60 HRC), can hold their edge for a very long time but can also be more brittle. This means the edge might be more prone to micro-chipping or bending under stress, even if it stays sharp longer.
Softer steels, on the other hand, might dull faster but are generally more forgiving and less prone to deformation. For most high-quality kitchen knives, made from steels within the typical range of 55-60 HRC, the usage-based guidelines provided above are usually accurate. If you have a specialty knife with an exceptionally hard or soft steel, you might need to adjust your honing frequency based on its specific performance.
When to Honing Isn't Enough: Time to Sharpen
This is where the confusion often creeps in. Honing is about realigning; sharpening is about reforming. If you’re diligently honing your knife before each use or every few uses, and it still feels like it’s not cutting cleanly, that’s your cue that honing alone won’t do the trick.
It’s time for a proper sharpening.
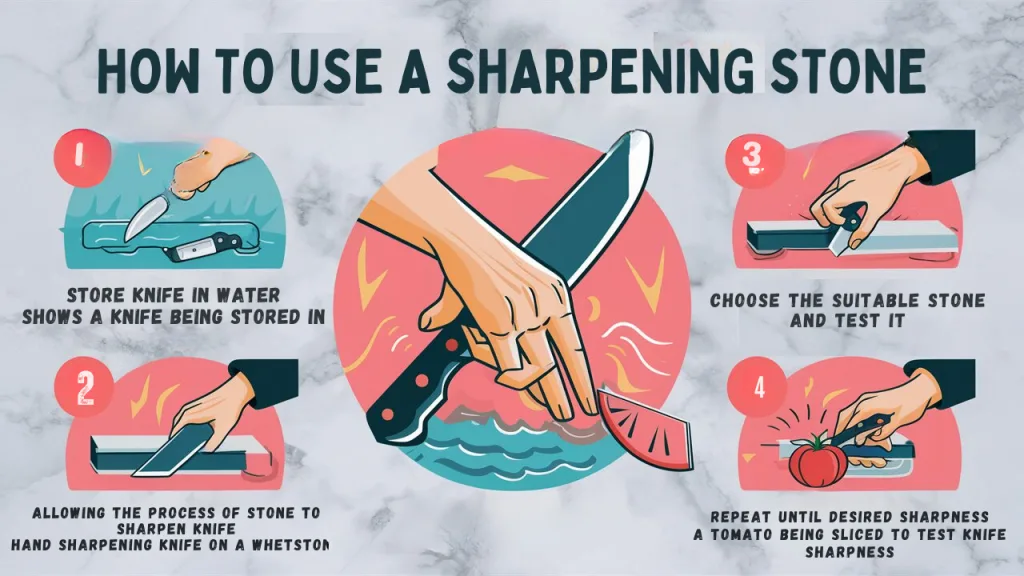
Image source: Bing (Web (fair-use with source credit))
When does honing just not cut it anymore? Look for these signs:
- Pushing, Not Slicing: You’re trying to cut through something soft, like a ripe tomato or a piece of cooked chicken, and instead of slicing through it smoothly, the knife pushes the food around and you have to saw back and forth. This is a classic sign of a dull edge that needs more than just realignment.
- Increased Effort: You find yourself needing to apply significantly more downward pressure to make cuts that used to be effortless. This indicates the edge is genuinely losing its ability to bite into the food.
- Visible Edge Damage: In rare cases, you might see small nicks or rolls along the very edge of the blade. Honing can't fix physical damage; that requires removing material through sharpening.
Sharpening removes a small amount of metal to create a fresh, sharp edge. It’s a more aggressive process than honing. As a general guideline, aggregate user feedback suggests most home cooks need to sharpen their primary chef's knife anywhere from once every 6 months to twice a year, depending heavily on use and how well they maintain the edge with honing.
Common Mistakes When Honing Knives
Even though honing seems straightforward, there are a few common slip-ups that can either be ineffective or, worse, potentially damage your knife's edge. Understanding these mistakes can help you hone more effectively and safely.
- Using the Wrong Tool: Not all steels are created equal. While a traditional steel rod is for honing, some rods are actually diamond-coated or ceramic and are designed for sharpening. Using a sharpening rod for regular honing will remove metal and shorten the lifespan of your knife. Always ensure you're using a dedicated honing steel for realignment.
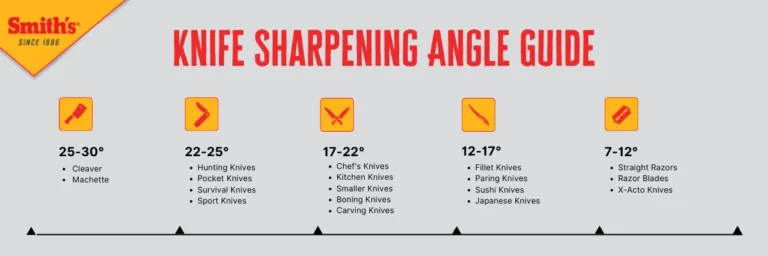
- Incorrect Angle: This is perhaps the most common mistake. Most Western-style kitchen knives (around 20 degrees per side) and many Japanese knives (often 15 degrees per side) require a specific angle to be maintained against the honing steel. Holding the knife at too steep or too shallow an angle won't effectively realign the edge, and can even cause damage. Consistency is key.
- Applying Too Much Pressure: Honing is a gentle process. You don't need to press down hard. The weight of the knife, combined with a light touch, is usually sufficient. Excessive force can bend the edge more severely or even damage the steel.
- Inconsistent Strokes: Moving the knife in short, jerky motions or varying the length of the stroke along the steel can lead to an unevenly honed edge. Consistent, smooth strokes from heel to tip (or tip to heel) ensure the entire edge receives attention.
- Forgetting the Other Side: Most knives have two bevels (sides). You need to hone each side equally. If you only hone one side, you’ll end up with an unevenly aligned edge. This is why alternating strokes on each side of the steel is crucial.
- Honing a Truly Dull Knife: If your knife is already very dull (i.e., it needs sharpening), trying to hone it extensively won't restore its sharpness. It’s like trying to comb tangled hair with a bent comb, it just won't work well. You’ll end up frustrating yourself and potentially further damaging the edge.
Pro Tips for Effortless Honing
Mastering the art of honing can significantly improve your cooking experience. It’s not about brute force or complicated techniques; it's about consistency and a few smart practices. Here are some tips that our research and common professional advice highlight to make your honing sessions more effective and easier.
- Find Your Angle: For most Western knives, a 15-20 degree angle is standard. Many honing steels have a guard, or you can use common household objects as guides. For instance, holding the steel upright and tilting the knife so its spine is about the thickness of your thumb away from the benchtop often approximates the correct angle. Experiment gently to find what works for your knife and your grip.
- The "Cross-Hatch" Motion: A common and effective technique involves alternating sides of the knife on the steel. Place the heel of the blade on the steel at your chosen angle, then draw the blade down and across the steel towards the tip in one smooth motion. Repeat this on the other side of the steel with the opposite side of the blade. Continue this alternating pattern for several strokes on each side.
- Heel to Tip, Tip to Heel: Ensure your stroke covers the entire length of the blade. Start with the heel of the knife near the bolster (where the blade meets the handle) and finish with the tip of the blade as it passes the end of the steel. This ensures the entire cutting surface gets attention.
- Listen and Feel: As you hone, you should feel a consistent, light drag. If you feel your knife skipping or catching, your angle might be off, or you could be applying too much pressure. Some users also report a subtle "singing" sound when the angle is correct.
- Stabilize Your Steel: If you're using a traditional steel rod, ensure it's stable. Many have a ring or handle designed to hang from a towel or sit on a cutting board. If yours doesn't, you can place the tip on a damp cloth or a non-slip mat to prevent it from sliding. Manufacturer guidelines often detail optimal methods for holding their specific honing tools. For example, studies on knife safety by organizations like the National Safety Council emphasize secure tool handling to prevent accidents.
- Don't Overdo It: While it's tempting to keep going, over-honing can actually be detrimental. For most home cooks, 5-10 strokes per side before each use or every few uses is more than enough. Professionals might hone more frequently, but they also have highly refined techniques.
- Clean Up Afterward: After honing, wipe both your knife blade and the honing steel with a clean, dry cloth to remove any microscopic metal particles. This keeps your tools clean and prevents potential contamination.
Step-by-Step Process: How to Hone Your Knife
Honing is a straightforward process once you understand the basic mechanics and angles. The goal is to consistently realign the blade's microscopic edge teeth. This is a skill that improves with practice, and doing it correctly can significantly extend the life and performance of your knives.
What You'll Need
- Your Knife: Cleaned and dry.
- Honing Steel: The correct type (not a sharpening rod, unless specified by the manufacturer).
- Stable Surface: To place your steel on.
The Honing Workflow
- Stabilize the Steel: Place the tip of your honing steel on a stable, non-slip surface like a damp cloth or a cutting board with a rubber mat. Ensure it won't move during the process.
- Grip the Knife: Hold your knife firmly by the handle. Position the blade so the heel (the part closest to the handle) is against the top of the steel.
- Set the Angle: For most Western knives, aim for a 15-20 degree angle between the blade and the steel. For Japanese knives, this is typically closer to 15 degrees. If you're unsure, tilting the knife so its spine is about the thickness of your thumb away from the steel often works as a visual guide.
- Begin the Stroke: Gently draw the knife down the steel, moving from the heel towards the tip. Apply light, consistent pressure. The blade should leave the steel at the tip.
- Alternate Sides: Flip the knife and repeat the process on the other side of the steel, using the same angle and motion. Start with the heel of this side of the blade and draw it down to the tip.
- Repeat: Continue alternating sides for 5-10 strokes per side. You should feel a consistent, smooth drag.
- Test and Clean: Carefully wipe both the blade and the steel with a clean cloth to remove any residual metal particles. Test the knife’s sharpness on a piece of paper or a soft vegetable.
Use Cases: Who Benefits Most from Regular Honing?
Regularly honing your knives isn't just for professional chefs. While they benefit immensely, there are several other groups and scenarios where consistent honing makes a noticeable difference. Understanding these use cases can help you decide if honing should become a more regular part of your kitchen routine.
The Everyday Home Cook
If you’re someone who enjoys cooking regularly, even for a few meals a week, honing is incredibly beneficial. It means your knives are always ready when you need them. Instead of struggling with a semi-dull knife to slice an onion, a quick hone ensures a clean cut.
This saves time and frustration during meal preparation.
For a home cook using a good quality chef's knife, honing every 2-3 uses means you’re generally keeping the edge in good shape. This prevents the blade from becoming so dull that it requires frequent, aggressive sharpening, which wears down the knife faster.
Culinary Enthusiasts and Hobbyists
For those who see cooking as a passion or hobby, the precision and ease that a sharp knife provides are paramount. These individuals often invest in high-quality knives and appreciate maintaining them at their peak performance. If you experiment with different recipes, handle a variety of ingredients, or simply enjoy the tactile experience of cooking, regular honing ensures your tools enhance, rather than hinder, your culinary adventures.
Food Professionals (Chefs, Butchers, Caterers)
This group is where consistent honing is almost non-negotiable. Professional kitchens demand efficiency and safety. A sharp knife is a safer knife because it requires less force and is less likely to slip.
Professionals often hone their primary knives before every single use, sometimes even multiple times during a busy service. This constant maintenance ensures that every cut is precise, from delicate herb chopping to butchering meat.
Anyone Who Owns Quality Knives
If you’ve invested in a good set of kitchen knives, whether they’re German steel, Japanese steel, or another quality material, you’ll want to protect that investment. Regular honing is a simple, low-cost way to maintain the knife’s edge and prevent premature wear. It helps preserve the sharpness and integrity of the blade, ensuring your knives perform well for years to come.
It's a core part of knife maintenance, as recommended by many knife care guides and manufacturers.
Mistakes to Avoid: When Honing Goes Wrong
While honing is generally safe and beneficial, certain mistakes can diminish its effectiveness or even damage your knife. Avoiding these common pitfalls ensures you're getting the most out of your honing efforts and keeping your blades in optimal condition.
- Confusing Honing with Sharpening: This is the biggest mistake. Honing realigns the edge; sharpening removes metal to create a new edge. Using a sharpening steel (like a diamond rod) for regular honing will actually shorten the life of your knife by removing excess material. Always identify your tool: if it feels abrasive and leaves metal dust, it's likely for sharpening. If it's a smooth metal rod, it’s for honing.
- Incorrect Honing Angle: Holding the knife at the wrong angle against the steel is ineffective. If the angle is too steep, you won't properly realign the edge. Too shallow, and you might even damage the very tip of the edge. As discussed, for most Western knives, this is around 15-20 degrees per side. Consistent angle is more important than the exact degree.
- Too Much Pressure: Honing is a gentle process of persuasion, not force. You don't need to press down hard. The slight friction between the steel and the edge is enough to realign the microscopic teeth. Applying too much pressure can re-bend the edge or even cause it to chip.
- Uneven Strokes: Inconsistent pressure or stroke length can lead to an unevenly honed edge. Ensure each stroke covers the entire length of the blade from heel to tip, and that the pressure is consistent throughout. This ensures the entire cutting surface benefits from the realignment.
- Only Honing One Side: Knives have two bevels, meaning two sides to the cutting edge. You must hone both sides to achieve a balanced, properly aligned edge. If you only hone one side, you'll end up with an uneven edge that performs poorly. Always alternate sides with each stroke.
- Neglecting Cleaning: After honing, fine metal particles from the steel and the blade can be present. These should be wiped away from both the steel and the knife with a clean cloth. Leaving them can transfer to food or create a mess.
Pro Tips for Effortless Honing
Mastering the art of honing can significantly improve your cooking experience. It’s not about brute force or complicated techniques; it's about consistency and a few smart practices. Here are some tips that our research and common professional advice highlight to make your honing sessions more effective and easier.
- Find Your Angle: For most Western knives, a 15-20 degree angle is standard. Many honing steels have a guard, or you can use common household objects as guides. For instance, holding the steel upright and tilting the knife so its spine is about the thickness of your thumb away from the benchtop often approximates the correct angle. Experiment gently to find what works for your knife and your grip.
- The "Cross-Hatch" Motion: A common and effective technique involves alternating sides of the knife on the steel. Place the heel of the blade on the steel at your chosen angle, then draw the blade down and across the steel towards the tip in one smooth motion. Repeat this on the other side of the steel with the opposite side of the blade. Continue this alternating pattern for several strokes on each side.
- Heel to Tip, Tip to Heel: Ensure your stroke covers the entire length of the blade. Start with the heel of the knife near the bolster (where the blade meets the handle) and finish with the tip of the blade as it passes the end of the steel. This ensures the entire cutting surface gets attention.
- Listen and Feel: As you hone, you should feel a consistent, light drag. If you feel your knife skipping or catching, your angle might be off, or you could be applying too much pressure. Some users also report a subtle "singing" sound when the angle is correct.
- Stabilize Your Steel: If you're using a traditional steel rod, ensure it's stable. Many have a ring or handle designed to hang from a towel or sit on a cutting board. If yours doesn't, you can place the tip on a damp cloth or a non-slip mat to prevent it from sliding. Manufacturer guidelines often detail optimal methods for holding their specific honing tools. For example, studies on knife safety by organizations like the National Safety Council emphasize secure tool handling to prevent accidents.
- Don't Overdo It: While it's tempting to keep going, over-honing can actually be detrimental. For most home cooks, 5-10 strokes per side before each use or every few uses is more than enough. Professionals might hone more frequently, but they also have highly refined techniques.
- Clean Up Afterward: After honing, wipe both your knife blade and the honing steel with a clean, dry cloth to remove any microscopic metal particles. This keeps your tools clean and prevents potential contamination.
Frequently Asked Questions About Knife Honing
How often should I hone my knife?
The frequency depends on usage. For heavy daily use, hone before each session. For moderate home cooking, hone every 2-3 uses.
For light use, weekly might suffice. Always pay attention to how your knife cuts.
Is honing the same as sharpening?
No. Honing realigns the microscopic teeth on your blade's edge, while sharpening removes metal to create a new edge. Honing can be done frequently; sharpening is less frequent.
What's the correct angle for honing?
For most Western knives, 15-20 degrees per side is standard. Japanese knives often use around 15 degrees. Consistency at your chosen angle is key.
Can I use a sharpening steel to hone?
Generally, no. A traditional steel rod is for honing. Diamond-coated or ceramic rods are typically for sharpening and will remove metal if used for frequent honing.
Always check your tool's intended use.
How do I know if my knife needs sharpening, not just honing?
If honing no longer restores a clean slicing ability, and you find yourself needing to saw through soft foods or apply excessive pressure, it's time for sharpening. Visible nicks or rolls on the edge also indicate a need for sharpening.