How to Sharpen a Knife at Home?
Tired of a dull knife making meal prep a chore? Learning how to sharpen a knife at home is a skill that pays off, transforming your kitchen experience. A sharp blade doesn't just cut better; it's safer because it requires less force, reducing the risk of slips.
Our research confirms that maintaining a keen edge is entirely achievable with the right approach and tools. We'll walk you through the essentials, from understanding the different sharpening methods to the actual techniques that will bring your knives back to life, ensuring you can achieve a professional-grade edge right on your countertop.
Quick Answer
Sharpening a knife at home involves using abrasive tools like whetstones or electric sharpeners to refine the blade's edge. Maintain a consistent angle, typically 15-20 degrees. Regularly hone your knives to keep the edge aligned between full sharpenings.
Proper technique and tool selection are key to achieving a sharp, safe blade.
Why Visuals Are Your Best Friend for Sharpening Knives
When you're trying to learn a physical skill like sharpening, words can only go so far. Understanding the correct angle, the subtle pressure to apply, and the visual cues that tell you you're on the right track is key, and that's where visuals truly shine.
If you were watching a video or looking at a series of photos, you'd see precisely how to hold the knife, the slight tilt of the blade against the sharpening surface, and the consistent motion required. These visual aids help you internalize the technique much faster than just reading instructions. Without them, you might miss crucial details that make all the difference between a well-sharpened knife and one that's just sort of "sharper."

Getting Started: What You Need to Sharpen at Home
Before you even think about touching a dull blade to a sharpening surface, you need to have the right gear and a basic understanding of how it all works. This isn't complicated, but having the correct tools makes the entire process smoother and more effective.
Essential Tools: Sharpeners, Steels, and More
To sharpen your knives at home, you'll need a few core items. The primary tool is a knife sharpener, which comes in various forms. You'll also want a honing steel, often called a sharpening steel, which is different from a sharpener but crucial for maintaining an edge.
Many home cooks also find a good cutting board essential for a stable workspace.
Here’s a quick rundown of what you'll likely encounter and need:
- Whetstone (Sharpening Stone): These are blocks of abrasive material, often water-activated or oil-lubricated, that you move the knife edge across. They come in different grits to remove metal and refine the edge.
- Honing Steel (Sharpening Steel): This tool realigns microscopic teeth on the blade's edge that become bent during use. It doesn't remove much metal, but it keeps an edge sharp for longer between actual sharpening sessions. They can be made of steel, ceramic, or diamond.
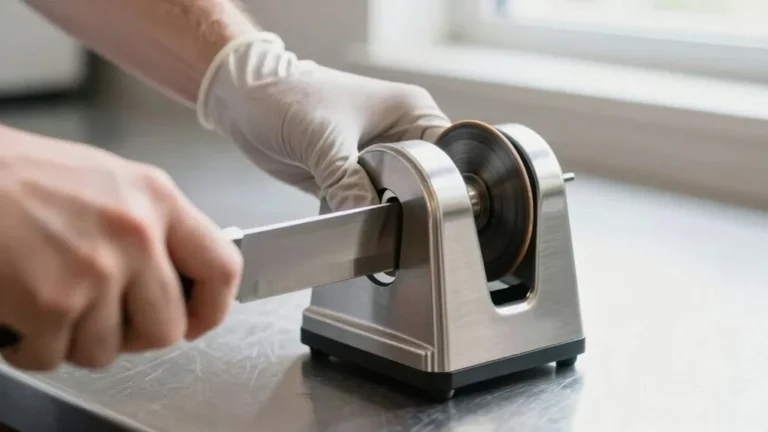
- Electric Knife Sharpener: These machines use motorized abrasive wheels or belts to quickly sharpen knives. They offer speed and convenience but can sometimes remove more metal than necessary if not used carefully.
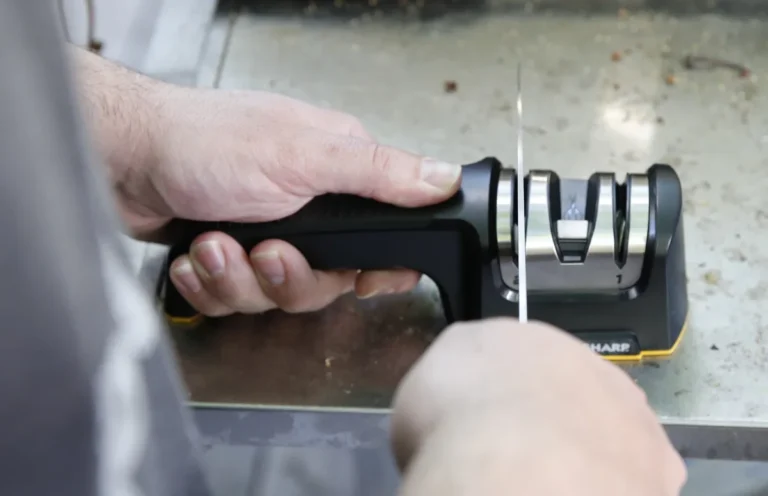
- Manual Knife Sharpener (Pull-Through): These are compact devices with slots you pull the blade through. They're simple and portable, but generally offer less control over the angle and edge quality than other methods.
Understanding Grit: The Key to a Fine Edge
The term "grit" refers to the size of the abrasive particles on a sharpening stone or wheel. It's a critical spec for anyone wanting to sharpen knives at home, as different grits serve different purposes. Think of it like sandpaper: a lower grit number means coarser particles that remove more material, while a higher grit number means finer particles that create a smoother, more polished edge.
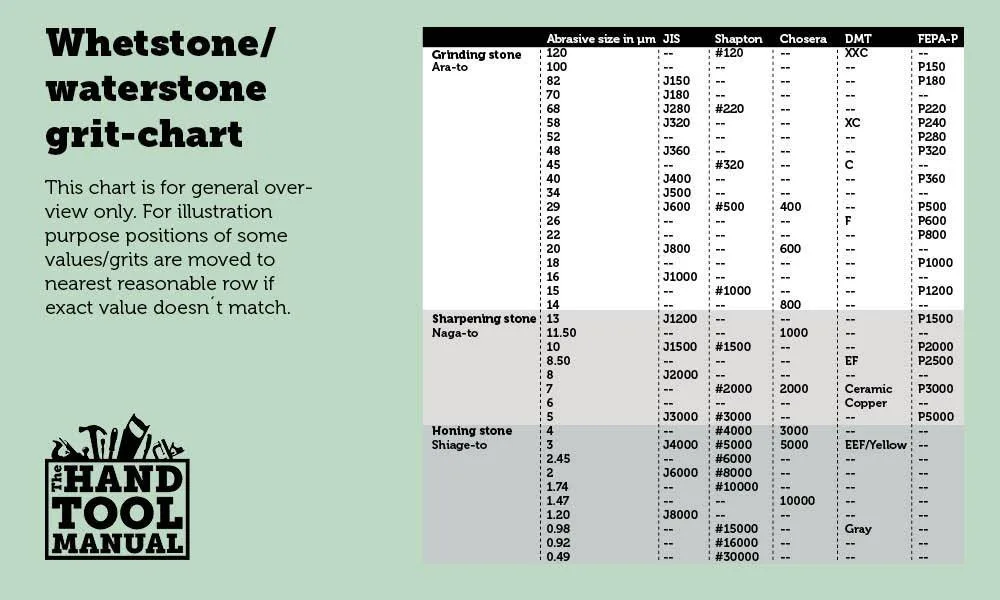
Here’s a general breakdown of grit levels and what they're used for:
- Coarse Grit (approx. 100, 400): This is for repairing significant damage, like chips or dull edges that haven't been sharpened in a long time. It removes metal quickly.
- Medium Grit (approx. 600, 1500): This is your go-to for general sharpening. It removes less metal than coarse grit and starts to refine the edge.
- Fine Grit (approx. 2000, 4000): Used for polishing the edge and making it sharper and smoother. It hones out any microscopic imperfections left by coarser grits.
- Ultra-Fine Grit (approx. 6000+): For achieving razor-sharp, mirror-polished edges. This is often used by professionals or enthusiasts for the ultimate sharpness.
Many sharpening stones, especially whetstones, are dual-grit, meaning they have two different grit levels on opposite sides, giving you more versatility in a single tool.
The Core Process: Sharpening Like a Pro, Step-by-Step
Sharpening a knife isn't rocket science, but it does require precision and patience. The goal is to create a fine, consistent edge by carefully removing a small amount of metal from the blade at a specific angle. We've broken down the process using a common method, the whetstone.
Step 1: Setting Up Your Workspace and Sharpener
First, you need a stable, flat surface to work on. A damp cloth or paper towel placed under your whetstone can prevent it from slipping. If you're using a water stone, you'll need to soak it in water until it stops bubbling, which can take anywhere from 5 to 20 minutes depending on the stone.
Manufacturer specifications will provide exact soaking times for their stones.
For oil stones, you’ll apply a thin layer of honing oil. Electric sharpeners and pull-through sharpeners generally don't require this prep; just ensure they are clean and placed on a stable surface.
Step 2: Finding and Holding the Right Angle
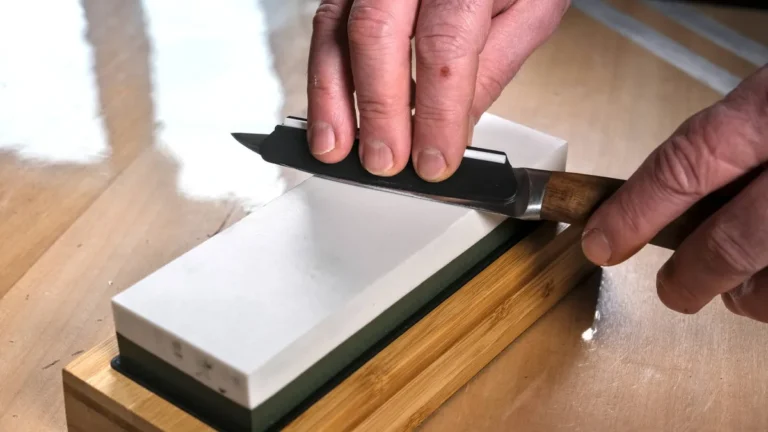
This is arguably the most critical step. Most Western-style knives benefit from an angle between 15 and 20 degrees per side. Japanese knives often use a slightly sharper angle, around 10 to 15 degrees.
If you’re unsure, a common guideline is to visualize the blade's edge making an angle similar to a stack of two quarters.
Many sharpeners, particularly electric and pull-through models, have built-in guides to ensure you maintain the correct angle automatically. With whetstones, you'll need to develop a feel for it. Try resting the blade flat on the stone, then lifting it until the spine is about the height of a dime or two stacked coins.
Maintaining this angle consistently throughout your strokes is paramount for an even edge.
Step 3: Working the Blade: Passes, Pressure, and Consistency
Once your sharpener is ready and you've found your angle, begin sharpening. For a whetstone, place the heel of the blade on the stone at your chosen angle and push it forward, away from you, in a smooth, controlled stroke. As you reach the tip of the blade, curve your stroke so the tip also contacts the stone.
Then, pull the blade back towards you, again at the correct angle, ensuring the entire edge makes contact.
Apply light, consistent pressure. You’re not trying to grind the metal away; you're refining it. Repeat this process for a set number of strokes on one side of the blade, about 5 to 10 passes is a good starting point for medium grit.
Step 4: Checking for the Burr: Your Sharpness Signal
A burr is a small ridge of metal that forms on the opposite side of the edge you're sharpening. It’s your indication that you’ve ground enough metal to reach the apex and create a sharp edge. You can feel for it by gently running your fingertip away from the blade's edge (never towards it!).
If you feel a slight “catch” or rough spot on the side opposite where you were just sharpening, you’ve formed a burr.
Once you feel a burr along the entire length of the blade, it’s time to switch to the other side. Repeat the sharpening strokes on this second side until you feel a burr form on the original side. This confirms you've worked the entire edge.
Step 5: Refining the Edge: Finer Grits and Stropping (Optional)
After establishing a burr and working both sides on a medium grit stone, you’ll move to a finer grit stone. This step polishes the edge, removing the burr and creating a much sharper, smoother finish. Repeat the same alternating strokes you used before, but with lighter pressure.
Some enthusiasts also use a strop, typically made of leather, for a final polish. Stropping involves drawing the blade away from the edge on the leather, alternating sides. This further refines the edge and removes any lingering burr, leaving you with a truly razor-sharp blade.
Honing vs. Sharpening: Knowing When to Use Which
It's easy to get honing and sharpening mixed up, but they serve different purposes and are not interchangeable. Think of it this way: sharpening is like giving your knife a haircut, while honing is like brushing its hair.
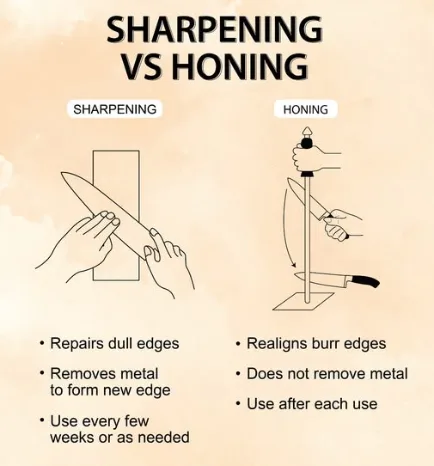
- Sharpening actually removes metal from the blade to create a new, sharp apex. You only need to do this when your knife feels dull and cutting becomes difficult, even after honing. This process typically involves whetstones, electric sharpeners, or pull-through sharpeners.
- Honing, on the other hand, realigns the microscopic teeth along the blade's edge that have become bent or rolled over during normal use. It doesn't remove significant amounts of metal. A honing steel or ceramic rod is used for this.
When to use which:
- Hone regularly: If you use your knives daily, honing them once a week or even before each significant use can maintain a sharp edge.
- Sharpen when dull: When honing no longer makes the knife feel sharp, it's time to sharpen. This might be every few months for a home cook, depending on usage.
Using a honing steel frequently will extend the time between actual sharpening sessions, keeping your knives performing better for longer.
Common Pitfalls: Mistakes That Ruin Your Edge (and Knife)
Even with the best intentions, it's easy to make mistakes when sharpening a knife at home. These errors can lead to an uneven, weak edge, or even damage the knife itself. Understanding these common traps can help you avoid them.
Angle Woes: Too Steep, Too Shallow, or Wobbly
The most frequent mistake is not maintaining a consistent angle. If the angle is too steep, the edge will be more prone to chipping. If it's too shallow, it won't cut effectively and will dull quickly.
- Too steep: Increases the risk of edge chipping.
- Too shallow: Reduces cutting ability and edge retention.
- Wobbly angle: Leads to an uneven edge that’s inconsistent and weak.
If you're using a whetstone, practice holding the angle steady. For pull-through or electric sharpeners, ensure you're using the guides correctly and not forcing the knife.
Over-Sharpening and Under-Sharpening Explained
It’s possible to do too much or too little. Over-sharpening means you're removing more metal than necessary, which can thin the blade excessively over time and reduce its lifespan. This often happens when someone applies too much pressure or makes far too many passes on the stone.
Under-sharpening is when you don't remove enough metal or fail to form a burr. You might think you've sharpened it, but the edge remains dull because the apex wasn't properly formed or refined. This is common when users don't use coarse enough grits for a very dull knife or don't make enough passes.
Material Mishaps: Using the Wrong Sharpener for Your Blade
Not all sharpening tools are suited for all knives. For example, trying to sharpen a very hard, high-carbon steel knife on a cheap, aggressive pull-through sharpener could chip the delicate edge. Conversely, using an ultra-fine stone on a heavily damaged or extremely soft steel knife won't fix the damage.
- Hard Steels: Require careful sharpening to avoid chipping.
- Soft Steels: Can be sharpened more easily but may dull faster.
- Serrated Knives: Need specialized sharpeners or techniques; standard sharpening methods won't work.
- Damaged Blades: May need a coarse grit or even a file to repair before finer sharpening.
Always consider your knife's steel type and its condition before selecting your sharpening method.
Choosing the Right Sharpener for Your Needs
When it comes to sharpening knives at home, the sheer variety of tools can be overwhelming. Your choice depends heavily on your budget, how much time you want to invest, and your personal preference for the sharpening process. Each type offers distinct advantages and disadvantages for home use.
Whetstones: The Traditionalist's Choice
Whetstones, also known as sharpening stones, are blocks of abrasive material that offer the most control over the sharpening process. They come in various forms, including water stones, oil stones, and diamond stones. Water stones are popular for their effectiveness and relatively clean operation once they're prepared.
- Pros: Offer the highest degree of control, can produce incredibly sharp edges, and are generally gentler on knife steel. They are often dual-grit, providing versatility.
- Cons: Require more practice and skill to use effectively, demand more time for preparation (soaking water stones) and technique.
- Best for: Enthusiasts who enjoy the craft of knife maintenance, those with high-quality knives they want to preserve, and anyone seeking the absolute sharpest edge.
Electric Sharpeners: Speed and Simplicity
Electric knife sharpeners are designed for convenience and speed. They feature motorized abrasive wheels or belts that do the work for you, typically guiding the knife at a pre-set angle. Many models offer multiple stages for sharpening and honing.
- Pros: Very fast and easy to use, require minimal skill, and consistently produce a reasonably sharp edge. Great for busy kitchens.
- Cons: Can remove more metal than manual methods, potentially shortening the lifespan of your knives over time. Offer less control over the final edge.
- Best for: Home cooks who need to sharpen knives quickly and without much fuss, and those who prefer automated convenience over manual technique.
Pull-Through Sharpeners: Convenience on a Budget
Pull-through sharpeners are compact, manual devices with slots you pull the knife through. They often use carbide or ceramic abrasive elements. They are highly portable and generally the most affordable sharpening option.
- Pros: Extremely simple to use, very portable, and inexpensive. Good for quick touch-ups.
- Cons: Offer the least control over the angle and edge quality. Can be aggressive and may remove excessive metal or even damage softer steels.
- Best for: Campers, occasional users, or anyone needing a quick, no-fuss way to restore a bit of sharpness to a dull knife without much investment in time or money.
Keeping It Sharp: Maintenance for Lasting Edges
Sharpening is just one part of knife care; regular maintenance is what truly keeps your blades performing at their peak. Consistent, light attention can significantly extend the time between full sharpening sessions and ensure your knives always feel ready for action.
The most crucial maintenance task is regular honing. As we discussed, a honing steel realigns the microscopic edge of your blade. If you use your knives daily for chopping vegetables or slicing proteins, honing them once a week is a good baseline.
For particularly active kitchens, honing before each major use is even better.
Beyond honing, proper cleaning and storage are vital.
- Clean Immediately: Wash knives by hand with warm, soapy water right after use. Never put good knives in the dishwasher, as the high heat, harsh detergents, and tumbling action can damage the blade and the handle.
- Dry Thoroughly: Always dry your knives completely after washing. This prevents rust and corrosion, especially on high-carbon steel blades.
- Store Safely: Store knives in a way that protects the edge. Options include knife blocks, magnetic strips, or in-drawer knife organizers. Avoid just tossing them into a drawer where they can bang against other utensils.
Following these simple maintenance steps means your knives will stay sharper, last longer, and be a joy to use for years to come. As of 2026, these practices remain the gold standard for home knife care.
When to Call in the Pros (or When Not To)
While sharpening a knife at home is achievable for most, there are times when professional sharpening services are a better, or even necessary, option. Understanding these scenarios can save you time, frustration, and potentially prevent damage to your valuable cutlery.
Consider professional sharpening if:
- You have very high-end or specialty knives: Knives made from extremely hard steels or those with intricate designs (like Damascus patterns) might benefit from the specialized equipment and expertise a professional offers. They can often handle precise angles and edge repairs that are difficult at home.
- Your knives have significant damage: If a blade has a large chip, a bent tip, or severe unevenness, a professional might have the tools and experience to repair it properly without compromising the blade. Attempting major repairs at home can be risky.
- You lack the time or patience: Frankly, some people just don't enjoy the process of sharpening. If it feels like a chore and you'd rather it be done right without you lifting a finger, a service is ideal.
- You’re unsure of your technique: If you've tried sharpening at home and consistently get poor results, or worry about damaging your knives, a pro can be a good learning experience or a reliable solution.
When to stick with home sharpening:
- Routine maintenance: Regular honing and sharpening for everyday use knives are perfectly manageable at home with the right tools and a little practice.
- Most kitchen knives: Standard chef's knives, paring knives, and utility knives are generally well-suited for home sharpening methods.
- Budget constraints: Professional sharpening can add up. For a few basic knives, investing in a decent whetstone or electric sharpener is often more cost-effective long-term.
- Learning a new skill: If you're keen to learn knife maintenance and enjoy the hands-on aspect, sharpening at home is a rewarding skill to develop.
Frequently Asked Questions About Knife Sharpening
How long does it take to sharpen a knife at home?
The time varies greatly depending on the method and the knife's current condition. Using an electric sharpener might take only 30-60 seconds per knife. Sharpening with a whetstone can take anywhere from 5 to 15 minutes per knife, especially if it requires significant metal removal or refinement through multiple grit levels.
How often should I sharpen my knives?
For most home cooks, sharpening is needed when honing no longer brings the edge back. This typically means every 3-6 months, depending on how heavily the knives are used. Daily users might need sharpening more often, while very light users might go a year or more.
Regular honing, however, should be done weekly or even more frequently.
Can I sharpen serrated knives at home?
Yes, but it requires specialized tools. Standard sharpening stones and electric sharpeners are not designed for serrated edges. You'll need a specific serrated knife sharpener, often a ceramic rod or a specialized pull-through device that can follow the teeth.
The process is different and requires attention to each individual scallop.
What is the best sharpening angle?
For most Western-style knives (like those common in US and European kitchens), a 15- to 20-degree angle per side is ideal. Japanese knives often benefit from a sharper angle, typically 10 to 15 degrees. The key is consistency; whatever angle you choose, maintain it precisely on both sides of the blade for an even edge.